AdGuard DNS: What It Is & How to Set It Up on Any Device (2025)

AdGuard DNS is a free DNS service designed to block intrusive ads and protect your devices from online threats. Instead of using the default DNS servers provided by your internet service provider, you can switch to AdGuard DNS to filter malicious content right from the first connection. This not only enhances your browsing speed but also improves your online privacy and security.
In this article, Antidetect Browser Hidemium will explore in detail what AdGuard DNS is, compare it with other popular DNS services, and provide step-by-step instructions for setting it up on Windows, macOS, Android, iOS, and routers.
1. What is AdGuard DNS?
AdGuard DNS is a DNS solution developed by the security company AdGuard, which allows users to:
- Block ads in browsers and apps.
- Prevent access to malicious, phishing, or spyware-infected websites.
- Improve page load speed by eliminating unnecessary ad content.
- Protect personal data, as AdGuard promises not to store users' DNS queries history.
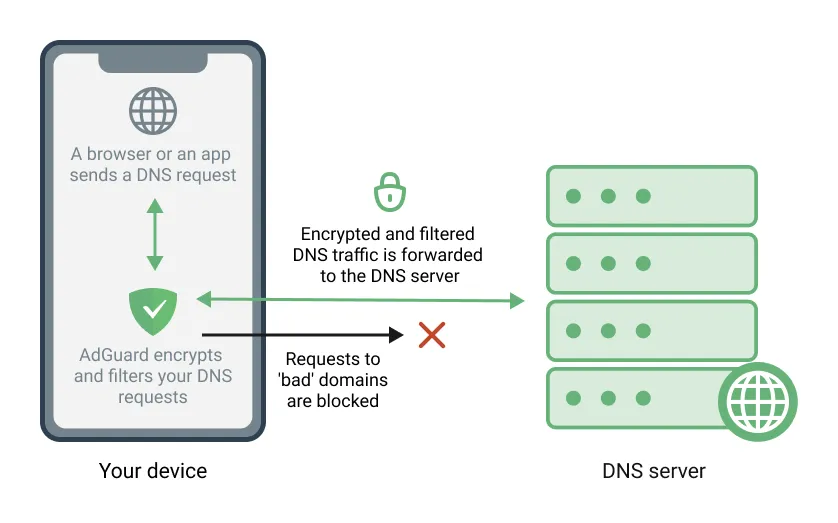
When your device is configured to use AdGuard DNS servers, all your internet traffic is filtered through AdGuard's system before reaching the target website. This helps reduce the risk of tracking, malware infections, and personal data theft while browsing online.
2. AdGuard DNS Server Addresses (Quick Reference Table)
Before configuring AdGuard DNS on any device, note down the correct server addresses for your preferred mode:
| Mode | Primary DNS | Secondary DNS | DNS-over-HTTPS (DoH) | DNS-over-TLS (DoT) |
|---|---|---|---|---|
| Default (blocks ads & trackers) | 94.140.14.14 | 94.140.15.15 | https://dns.adguard-dns.com/dns-query | tls://dns.adguard-dns.com |
| Family Protection (blocks adult content) | 94.140.14.15 | 94.140.15.16 | https://family.adguard-dns.com/dns-query | tls://family.adguard-dns.com |
| Non-filtering (no blocking) | 94.140.14.140 | 94.140.14.141 | https://unfiltered.adguard-dns.com/dns-query | tls://unfiltered.adguard-dns.com |
3. What are the Pros and Cons of AdGuard DNS?
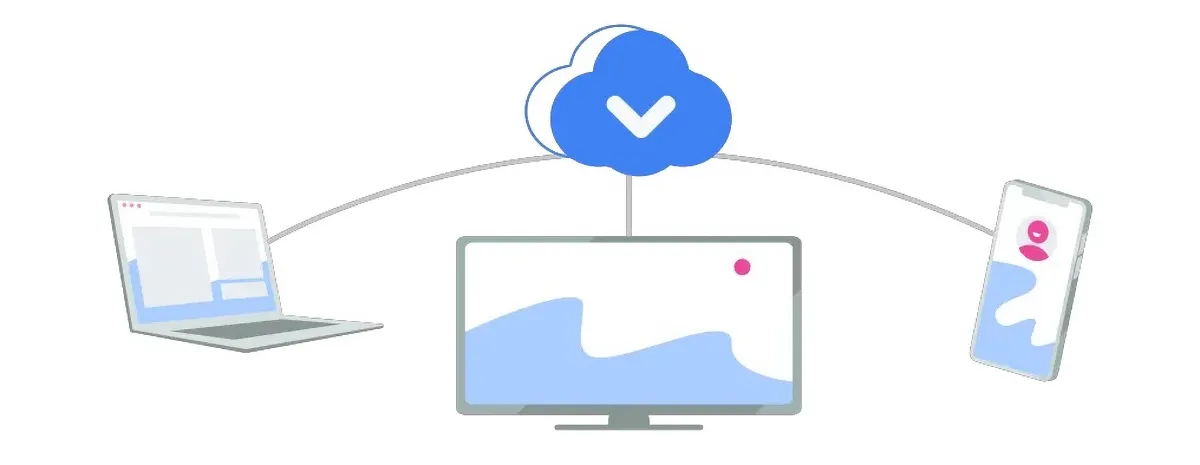
AdGuard DNS is a highly-rated solution for blocking ads and protecting personal data while browsing the Internet. However, like many DNS services, it comes with both advantages and some limitations. The table below will help you better understand and make an informed decision:
| Key Advantages | Considerable Limitations |
|---|---|
| Easy to set up: No need to install additional software or apps – just change your DNS settings and you're good to go. | Cannot block all ads: The free version is not powerful enough to eliminate all web ads. |
| Free and open-source: Users can enjoy the service at no cost, ideal for basic needs. | Some websites are restricted: Sites that require ad-blockers to be disabled may become inaccessible. |
| Enhanced security: Supports modern encryption protocols like DNSCrypt, DNS-over-TLS, and DNS-over-HTTPS to keep personal data safe. | Affects website layout: Blocking ads may leave blank spaces that impact website aesthetics. |
| Content control: Offers two modes – standard and family – to help parents manage children's internet usage. | Only one free option available: Users can choose either DNS or VPN, not both simultaneously unless upgraded. |
| Device compatibility: Works smoothly across smartphones, tablets, and computers. | Limited advanced features: To unlock full functionality, a premium subscription is required. |
| No data collection: AdGuard DNS commits to not logging browsing history or storing user data. | |
| Speeds up browsing: Ad blocking helps improve page load times. |
AdGuard DNS is a solid choice if you're looking for a free, user-friendly tool to enhance browsing privacy and security. However, for more comprehensive ad-blocking and advanced features, upgrading to a paid plan or combining with a VPN service is recommended.
4. AdGuard DNS vs Other DNS Services
Wondering how AdGuard DNS stacks up against other popular alternatives? Here's a quick comparison to help you decide:
| Feature | AdGuard DNS | Cloudflare (1.1.1.1) | Google (8.8.8.8) | NextDNS |
|---|---|---|---|---|
| Built-in ad blocking | ✅ Yes | ❌ No | ❌ No | ✅ Custom |
| Privacy / No-log policy | ✅ Yes | ✅ Yes | ⚠️ Partial | ✅ Yes |
| DNS-over-HTTPS (DoH) | ✅ Yes | ✅ Yes | ✅ Yes | ✅ Yes |
| Family protection mode | ✅ Yes | ✅ Yes | ✅ Yes | ✅ Yes |
| Free tier available | ✅ Full free | ✅ Full free | ✅ Full free | ⚠️ Limited |
| Speed | Fast | Fastest | Fast | Fast |
| Custom blocklists | ✅ (paid) | ❌ No | ❌ No | ✅ Yes |
Bottom line: AdGuard DNS is the best free option if ad-blocking is your priority. Cloudflare wins on raw speed. NextDNS offers the most customization but requires a paid plan for heavy usage.
5. AdGuard DNS Modes: Flexible and Comprehensive Security for Users
AdGuard DNS is not just an ad-blocking tool — it offers various flexible modes, allowing users to tailor their settings to control accessible content and enhance online security. Here are the key modes you can choose from:
- Default Mode: Automatically blocks ads, malware, and harmful websites, providing a safer browsing experience.
- Family Protection Mode: Specially designed for households with children, this mode filters out inappropriate content like adult websites or harmful media.
- No Filtering Mode: Disables all filters and allows you to access any content without interference.
- Custom Mode: For advanced users — manually set up lists of websites to block or allow, giving you complete control over your browsing experience.
- Encrypted DNS Mode (DNS-over-HTTPS/DNS-over-TLS): Enhances privacy by encrypting DNS queries, preventing third parties from tracking your online activity.
- DNS Query Log Mode: Records your DNS query history, allowing you to monitor and track network activity transparently.
6. How to Configure AdGuard DNS on Windows
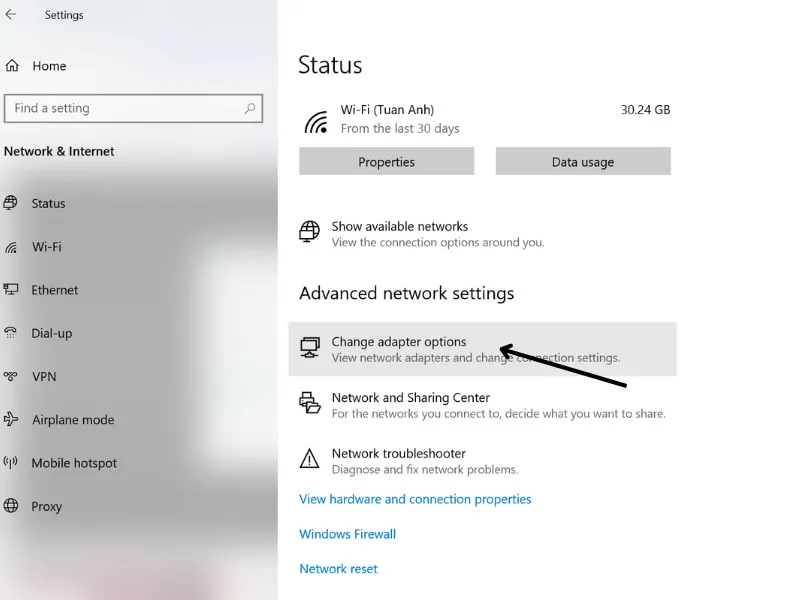
You can easily configure AdGuard DNS on your Windows PC by following these steps:
Step 1: Access Network Settings
Right-click on the network icon in the bottom-right corner of the taskbar and select "Open Network & Internet settings". Then go to "Network and Internet" and choose "Change adapter options".
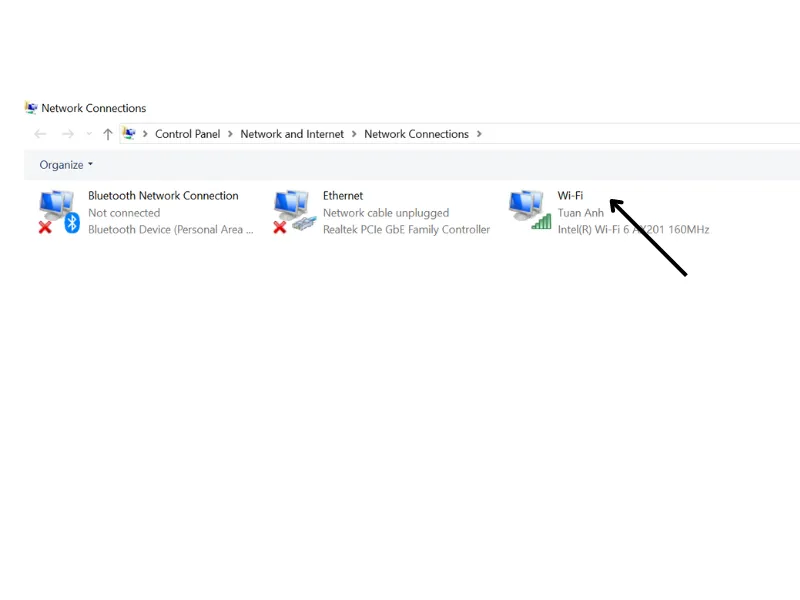
Step 2: Select Your Active Network Connection
In the list of connections, right-click on your active connection (Wi-Fi or Ethernet) and select "Properties".
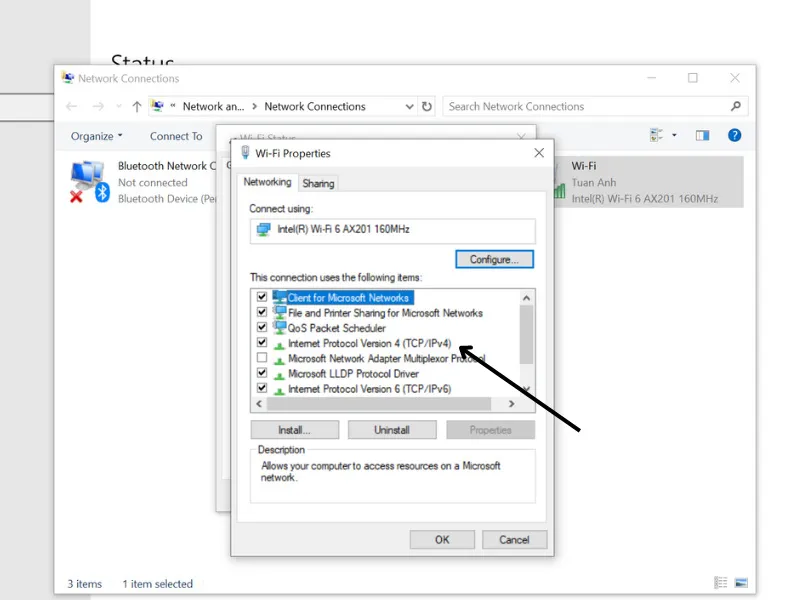
Step 3: Set AdGuard DNS Addresses
Select "Internet Protocol Version 4 (TCP/IPv4)" and click Properties. In the "Use the following DNS server addresses" section, enter:
- Primary DNS server: 94.140.14.14
- Secondary DNS server: 94.140.15.15
Step 4: Save and Finish
Click OK, then Close to save changes and complete the configuration.
7. How to Set Up AdGuard DNS on macOS
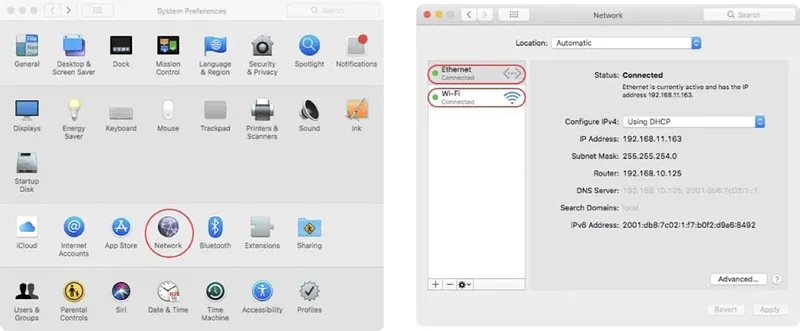
If you're using a MacBook and want to block ads, enhance browsing speed, or improve privacy, follow these steps:
Step 1: Open Network Settings
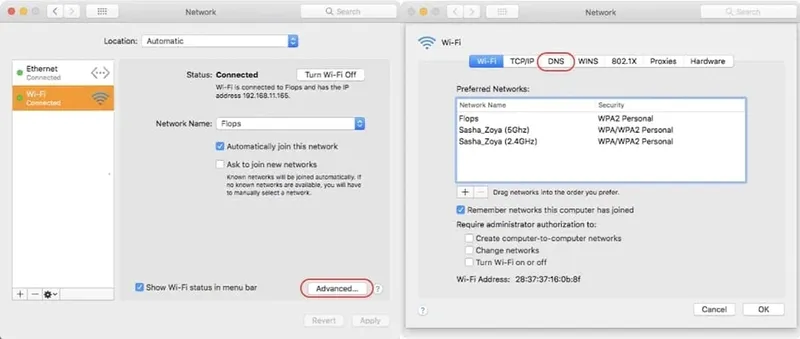
Go to System Settings (or System Preferences for older macOS versions), then select Network.
Step 2: Choose the Network Connection
Select the Wi-Fi or Ethernet connection you want to configure. Click Advanced, then switch to the DNS tab.
Step 3: Add AdGuard DNS Addresses
Click the + icon and add the following DNS addresses:
- Primary server: 94.140.14.14
- Secondary server: 94.140.15.15
Step 4: Save the Configuration
Click OK to save the changes and complete the setup.
8. How to Set Up AdGuard DNS on Android
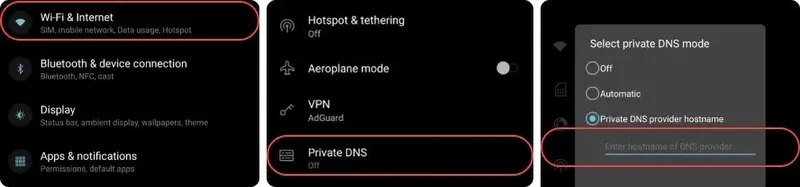
Android users can configure AdGuard DNS either through the app or manually.
Method 1: Install via AdGuard App
Step 1: Download and install the AdGuard app from the Google Play Store. Once installed, open the app and go to Settings.
Step 2: Select DNS Filtering. Choose AdGuard DNS (94.140.14.14) or AdGuard DNS Family Protection (94.140.14.15) to block ads and filter inappropriate content.
Step 3: Tap Use this server to activate the selected DNS on your device.
Method 2: Manual DNS Configuration
Step 1: Go to Settings > Wi-Fi.
Step 2: Long-press your current Wi-Fi network and tap Modify Network.
Step 3: In Advanced options, change IP settings from DHCP to Static.
Step 4: Enter the following AdGuard DNS addresses:
- DNS 1: 94.140.14.14
- DNS 2: 94.140.15.15
Step 5: Tap Save to complete the setup.
9. How to Set Up AdGuard DNS on iPhone (iOS)
If you're using an iOS device, configuring AdGuard DNS can enhance your security and protect your privacy while browsing.
Method 1: Set Up via the AdGuard App
Step 1: Open the App Store, search for "AdGuard for iOS," then download and install the app.
Step 2: Open the AdGuard app, go to Tracking Protection and enable the feature.
Step 3: Go to DNS encryption, then choose AdGuard DNS or AdGuard DNS Family based on your needs.
Method 2: Manual DNS Setup (No App Required)
Step 1: Go to Settings on your iOS device.
Step 2: Select Wi-Fi, then tap the name of your connected network.
Step 3: Scroll to the DNS section, switch to Manual, and enter:
- DNS 1: 94.140.14.14
- DNS 2: 94.140.15.15
Step 4: Tap Save to complete the setup.
10. How to Set Up AdGuard DNS on Ubuntu
For Ubuntu users, configuring AdGuard DNS helps block ads, protect privacy, and optimize web browsing.
Step 1: Open Network Settings
Go to Settings and select Network.
Step 2: Choose Your Network Connection
Click the active Wi-Fi or Ethernet connection you want to configure.
Step 3: Set Up DNS Addresses
Switch to the IPv4 tab, choose "Automatic (DHCP) addresses only", and enter:
- Primary DNS: 94.140.14.14
- Secondary DNS: 94.140.15.15
Step 4: Save and Apply Changes
Click Apply to save and finish the setup.
11. How to Set Up AdGuard DNS on a Router
Setting AdGuard DNS on your router is the most efficient method — it automatically applies ad-blocking and tracker protection to every device connected to your home network without needing to configure each device individually.
Step 1: Access Your Router Admin Panel
Open a browser and type your router's IP address (usually 192.168.1.1 or 192.168.0.1). Log in with your admin credentials.
Step 2: Navigate to DNS Settings
Look for a section called "WAN Settings", "Internet Settings", or "DNS Configuration" depending on your router brand (TP-Link, ASUS, Netgear, etc.).
Step 3: Enter AdGuard DNS Addresses
Replace the existing DNS servers with:
- Primary DNS: 94.140.14.14
- Secondary DNS: 94.140.15.15
Step 4: Save and Restart
Save your settings and restart the router. All connected devices will now use AdGuard DNS automatically.
12. Frequently Asked Questions (FAQ)
Is AdGuard DNS free?
Yes, AdGuard DNS offers a free tier that includes ad-blocking, tracker protection, and malware filtering. Advanced features like custom blocklists and statistics require a paid subscription.
Does AdGuard DNS slow down internet speed?
No. In most cases, AdGuard DNS actually speeds up browsing by blocking ad requests that consume bandwidth. Response times are comparable to Google DNS and Cloudflare.
What is the difference between AdGuard DNS and AdGuard VPN?
AdGuard DNS only filters DNS-level traffic (blocking ads and trackers at the domain level), while AdGuard VPN encrypts all your internet traffic and masks your IP address. They serve different purposes and can complement each other.
Can I use AdGuard DNS on a router?
Yes. Setting AdGuard DNS on your router applies protection to all devices on your network simultaneously. See Section 11 above for step-by-step instructions.
What are the AdGuard DNS server addresses?
The primary AdGuard DNS address is 94.140.14.14 and the secondary is 94.140.15.15. For Family Protection, use 94.140.14.15 and 94.140.15.16. See the full table in Section 2.
Need help managing multiple browser profiles securely? Hidemium Antidetect Browser provides powerful tools for privacy-focused users who want to separate their online identities effectively.
Related Blogs
Viettel DNS is a simple yet effective solution to bypass network restrictions like Facebook blocking, slow YouTube loading, or unstable internet connections. So what DNS addresses does Viettel currently offer? How can you change DNS settings to improve internet speed? Let’s dive into the details with Hidemium.1. List of Popular Viettel DNS AddressesViettel DNS is a Domain Name System service[…]
How to Protect Against Browser FingerprintingBrowser fingerprint protection: Quick answerBrowser fingerprint protection is the process of reducing how unique and trackable your browser looks online. The best approach is not one single tool. It is a layered system: use privacy-focused settings, avoid unusual configurations, separate browser profiles, control cookies and storage, keep fingerprint[…]
Hotspot Shield VPN is one of the software virtual private network (VPN) most popular today, trusted by many users thanks to its superior security and support for anonymous Internet access. With a series of useful features, Hotspot Shield becomes the ideal choice for those who want to protect their privacy online. So what is Hotspot Shield? What are the advantages and how to download this[…]

Browse TinderYou've swiped until your thumb is sore, yet your inbox remains a frustrating ghost town. Most people assume finding a match requires winning a genetic lottery, but treating the experience purely as a game of luck is exactly what keeps you hidden. The reality is that your digital first impression matters far more than flawless genetics.Instead of a beauty pageant, picture this[…]
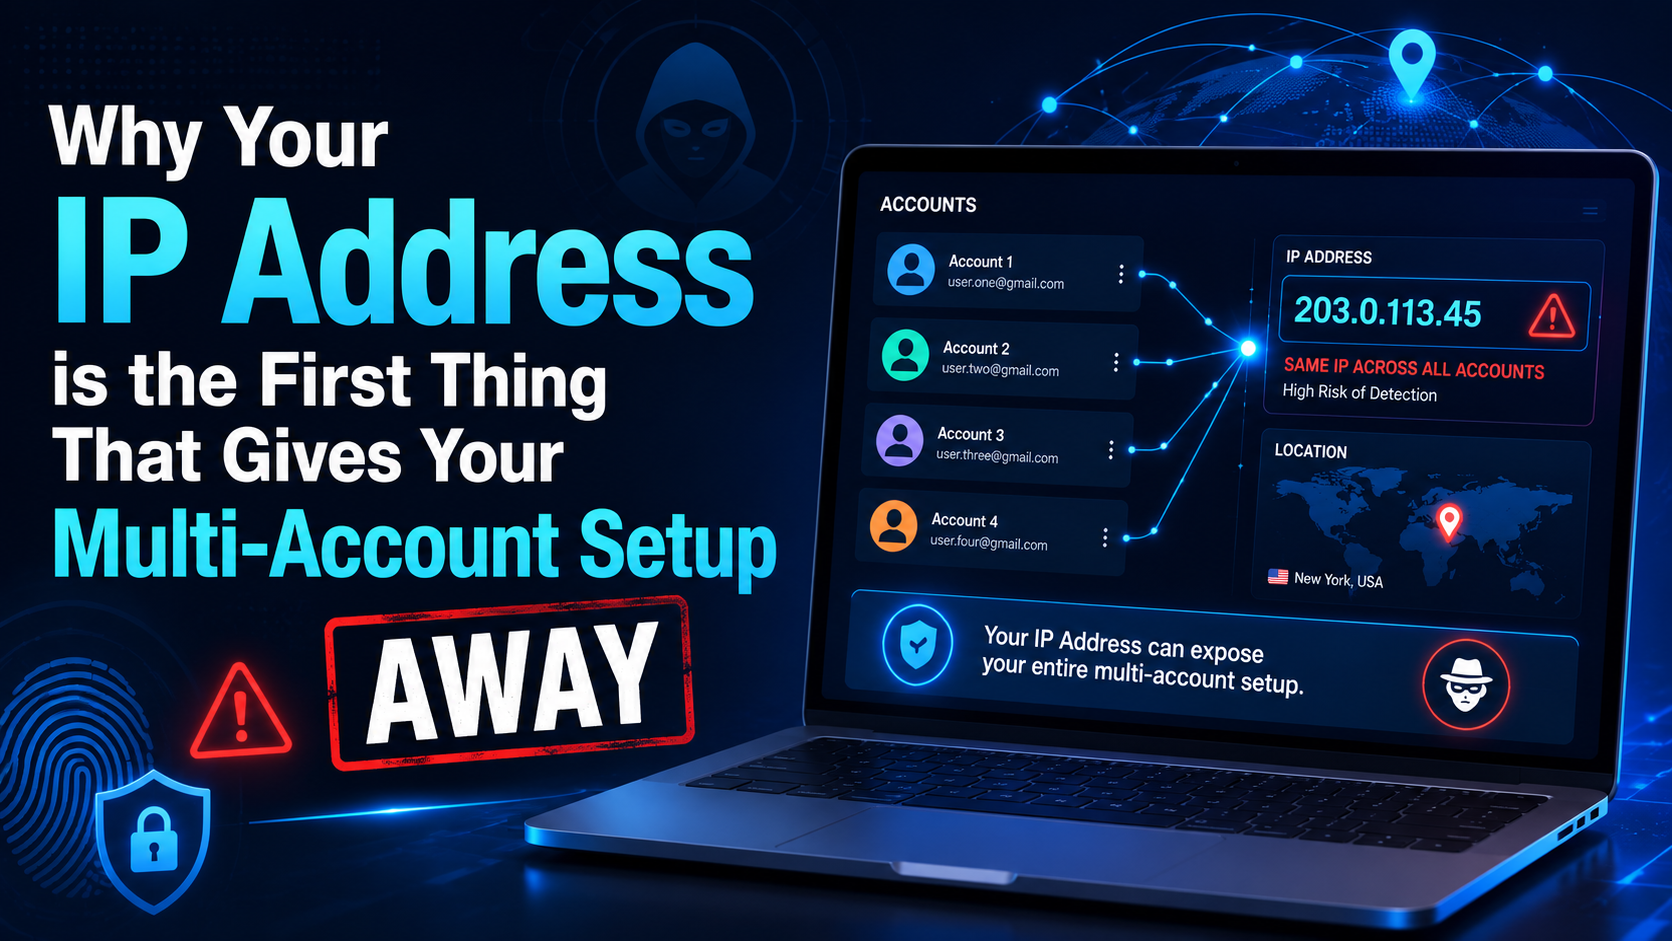
If you've ever managed more than one account on the same platform or a second Facebook ads account and a backup Amazon seller profile a handful of social media pages for different clients you've probably run into the same wall. One day the accounts are working fine the next they're all restricted at once even though nothing in your login behavior changed.The usual suspect isn't your browser or[…]
.png)
Protecting your identity is essential for any business managing multiple accounts. And your IP address is first. In this article, we will guide all you need to know about hiding your IP and using another IP. From information consistency to data center solutions, from proxies to more.How to hide your IP addressWhat do you want to hide your IP address for?Websites track multiple browser[…]
